|
2/8/2024 0 Comments Beersmith 3 download The “Save As Default” Feature in BeerSmith.Related Beer Brewing Articles from BeerSmith: Please subscribe for regular weekly delivery, and don’t hesitate to leave a comment or send this article to a friend. I hope you enjoyed this week’s article from the BeerSmith Home Brewing Blog. From here you can rename it or import your template again to get the latest version imported into the system. If you need to make changes to your template, edit the template first, and then go back to Options->Reports and select the custom report and then click on Edit. You can scale it, print it or save a copy of the report from that same menu bar (splitting the preview pane and recipe list). The program will now display your named custom report in the preview pane. Your newly named report should be in the list – select it now. Select any recipe and then go to the drop down Report which is on the bar between the list of recipes and the preview window. On the bottom half of My Recipes view you have the preview pane that shows a preview of the currently selected recipe. Once you have completed that press Ok twice to save your changes, and go back to My Recipes view in the program. Next select the type (usually HTML) and finally click on the Import Template File to import your template file that you just created in the steps above. 
From there click on the the Add Report button and give your report a name. To add it go to Options->Reports (or BeerSmith->Preferences on the Mac) within BeerSmith. Lets say you have finished editing your custom report file and want to try it in BeerSmith. For example adding … around an element will make it bold. You can also use HTML and CSS within the file to style various elements if you are familiar with those constructs. How do you find the tags? Well we have a complete list here on the forum of tags you can use in your reports. When the report is displayed these tags are replaced with the real data. Many of these tags are from the BeerXML standard, but there are also over 100 custom tags you can include for just about any conceivable recipe field to display whatever you like in your report. Here’s a sample below from the recipe file – $TYPE is the recipe type (All Grain, Extract, Partial Mash, Cider, etc…), $DISPLAY_BATCH_SIZE is the batch size with units, etc… Type: $TYPE The tags all begin with a ‘$’ character and are in upper case such as $NAME. If we look at the top of the NewRecipe.html file in a simple text editor we see there is a bunch of text along with various tags. You can have multiple custom reports for different purposes and some users have even created reports to print beer labels and other interesting artwork. When editing the file I do recommend storing it under a different name such as “MyRecipe.htm” so you can differentiate it. Even something as simple as TextEdit on the Mac or Notepad on the PC will let you view this file. I don’t recommend using complex programs like Microsoft Word as they introduce a lot of HTML styling that can cause problems when you post your edited file back to BeerSmith. To edit the HTM files I recommend using a simple text editor or a simple HTML editor. CiderBrewSheet.htm – Current default brew sheet (brewing instructions) file.MeadBrewsheet.htm – Current default brew sheet (brewing instructions) file.ExtractBrewsheet.htm – Current default brew sheet (brewing instructions) file.recipetxt.txt – Current default text format recipe file.Competition.html – Competition recipe file.NewBrewSheet.htm – Current default brew sheet (brewing instructions) file.NewRecipe.htm – Current default recipe file.Note you can right click on the link and “save as” the report to a file for editing. You can download the most popular default reports from the links here to use as a template for your custom report. You can do this by starting with one of the default reports. Many users want to customize their reports to display additional information, add new instructions on brew day or display custom batch data. Custom Reports in BeerSmithīeerSmith desktop uses a simple HTML format or plain text format for all of its generated recipe reports. BeerSmith 2 had a slightly different setup where you need to copy your template to the Documents/Reports directory before adding it. The process described below applies to BeerSmith 3. 
This feature is currently only available on the desktop version of BeerSmith. This week I take a look at how you can create custom reports in the BeerSmith desktop program.
0 Comments
2/8/2024 0 Comments Audacity recording program  
This is mainly due to its simple, intuitive, and perfectly organized user interface. Unlike other editing programs, Audacity stands out for being very easy to use. That is why, for many, it is an indispensable tool for making podcasts. It is also perfect software for recording directly through a microphone as well as improving the sound quality of a track. With it, you can perform all kinds of audio editing tasks such as copying, cutting, mixing, or applying sound effects. 
It is powerful and versatile, which has gained the trust of musicians, podcasters, and recording enthusiasts from all over the world. Would you like to fully understand why it is the favorite software for recording and editing audio tracks? What is Audacity and what is it used for?Īudacity is an open-source program with which you can record and edit any audio track. And it surpasses rivals such as REAPER, Ableton Live, or Garageband, Audacity stands out as number one thanks to its wide range of tools and user-friendly interface accessible to everyone. Developed and distributed as open source software, Audacity is the favorite choice among beginners and professionals in the music and audio industry. Dinkar Kamat Updated a month ago The most powerful and versatile option to record and edit your audio files.Īudacity is a powerful free audio recording and editing program that, due to its versatility and good results, has become one of the most downloaded in recent years. 
Although you’re ready to play, sequencing the first cards you see may not always be the best move. While Spider Solitaire (2 Suits) is more advanced than the 1 suit version, these strategies can give you an edge: Strategies to Win Spider Solitaire (2 Suits) Learn more with our guide on how to play Spider Solitaire, or watch our instructional video. So move cards into the empty spaces before using the stockpile. However, you need a card in every column to do so. When you’re unable to move any more cards, you can click the stock pile, which will deal out 10 face-up cards, 1 to each column. Use the stockpile if you run out of moves.Filling empty spaces helps reveal other cards in your tableau. 
You can also move a column of cards as long as the entire column is the same suit. In Klondike Solitaire, only kings can move into empty spaces, but in Spider, any card can move into the empty space. Once you have a sequence that descends from king to ace of the same suit, it will immediately be placed into a foundation pile and removed from play. Instead of building on separate foundation piles, like in Solitaire, you build descending sequences within the tableau. If, however, the sequence includes a 6 of Hearts, 5 of Spades, and 4 Hearts, you cannot move that sequence. For example, if you’re playing with Spades and Hearts and have a 6 of Hearts, 5 of Hearts, and a 4 Hearts, you can move that whole set on top of a 7 of Hearts or a 7 of Spades. If you want to move an entire sequence or column of cards, the sequence or column must be of the same suit, and you can place it on a card that is 1 rank higher but of either suit. 
Move columns of cards if they are the same suit.For example, if you’re playing with Clubs and Diamonds, a 6 of Clubs can be placed on top of a 7 of Clubs or a 7 of whatever the second suit is (Diamonds, Hearts, or Spades). To arrange individual cards, you just move them on top of a card that is 1 rank higher-even if it’s not the same suit. Move individual cards by rank, regardless of suit.When you deal from the stock pile, you will be dealt 1 face-up card on each column, overlapping the cards already present. You begin with only 10 face-up cards, but you can free face-down cards by removing a face-up card from on top of it. The only cards you can move are the face-up cards in the columns of the tableau. These rules help you understand how to play Spider Solitaire (2 Suits): The waste pile: Unlike Solitaire, you don’t use a waste pile because the stockpile cards are dealt directly onto columns in the tableau.Instead, you create the entire sequence in the tableau and then transfer it to a foundation pile when it is complete. Additionally, you don’t build on those spaces during the game. The Foundation piles: Like classic Solitaire, you leave room at the top for foundation piles, but you need 8 spaces instead of 4.If the stock pile runs out and you can’t make any more moves, you have lost the game. When you are stuck and can’t make any more moves, you deal 1 card face-up to each column from the stock pile until the stock pile runs out. The stock pile: The remaining 50 cards are placed at the top left of your space, face-down, for the stock pile.You’ll arrange cards in the tableau in descending order instead of building on active foundation piles. All cards are face-down except the last card of each column, which is face-up. You deal out 54 cards from left to right in 10 columns, with 6 cards in the first 4 columns and 5 cards in the last 6 columns. The tableau: Like any Solitaire game, the tableau is the main area for play.Using two decks of two different suits, you arrange your game space into three key parts: These sequences get transferred to the 8 separate foundation piles. ObjectiveĬlear all the cards by building sequences within the tableau, separated by suit and arranged in descending order from King (high) to Ace (low). 
Well-suited for intermediate players, Spider Solitaire (2 Suits) uses 104 cards-1 deck of Hearts and 1 deck of Spades. If you enjoy Spider Solitaire but want more of a challenge, you’re ready for Spider Solitaire (2 Suits). 2/8/2024 0 Comments Mac folder icons colors Also, it's very strange that the ususal "delete" key would not work as expected to delete a photo from the app gallary you'd have to manully select, then right click on it and hit delete! Fix, please. A tedious workaround is to first open the picture in Preview, resize it using pich zoom to create black borders, then take multiple screenshots and try your luck to see if any of them would work! It doesn't seem like a huge feature to request but I hope it's under way. 
When selecting a photo, it might choose any central part of it and crop that to put on the folder, irrespectable of the picture resolution or your interest. The app doesn't seem to offer any control whatsoever on the exact portion of a photo you wish to set as folder picture. Enhance your folder management and folder appearance with this powerful, user-friendly app. Transform your Mac folders with Folder Colorizer PRO and enjoy an organized, stylish, and personalized workspace tailored just for you. If you ever change your mind, simply reset folder icons to the default baby-blue look, even after days of colorizing them.įolder Colorizer PRO is a Universal app that is fully optimized for Mac computers with Apple silicon as well as Intel chips.ĭesigned exclusively for macOS, Folder Colorizer PRO integrates seamlessly with macOS Ventura, ensuring a smooth and flawless experience. Refine folder icons with unlimited undo and redo options, allowing you to create a true masterpiece. Rest assured that your custom folder icons will remain intact when transferring them between Mac devices, including iCloud and shared folders, for seamless folder management. Use the search bar to quickly find images, emojis, or decals by typing a keyword, and instantly access thousands of options for your colored folder icons. Let the AI-powered 'Perform Magic' algorithm suggest the perfect folder customization based on folder names, saving you time and effort.Īpply the same background to multiple folders with just one click, making it easy to maintain a consistent look across your files for better folder organization. Utilize special symbols to instantly convey folder contents without the need for words, enhancing your folder organization. All your images are stored locally.Ĭhoose from an extensive collection of stunning photos from Unsplash, Pixabay, and Pexels to use as folder backgrounds, making each folder design unique.Īdd personality to your folder icons by incorporating one or more emojis that are both fun and functional for easy folder navigation. Mix and match from a vast range of colors, images, decals, and emojis to create one-of-a-kind folder icons and transform your folder theme.Īdd your own images & photos to use as folder backgrounds. Quickly locate folders with eye-catching folder image icons that stand out on your display, improving your folder management experience. Swap Mac's default baby-blue folder for a variety of vibrant colors, such as black, pink, white, green, or purple, to personalize your folder appearance. Featured by top tech media, including iDownloadBlog, iGeeksBlog, and, Folder Colorizer PRO has gained worldwide recognition as the go-to Mac app for folder customization and organization. With over 10 million colors, 3 million stock images, ability to upload your own images, 3,500 emojis, and 120 decals, you'll have endless possibilities to create unique folder icons for enhanced folder management and aesthetics. 
Introducing Folder Colorizer PRO, your ultimate solution to customize your Mac folders like never before! Simply drag & drop your favorite PNG or JPG images and set them as folder backgrounds! It can help to classify and find your folders easily with customized folder icons, which are more recognizable by using photos or colors that are more relevant to the contents of the folder and prominent than the standard generic blue tabbed folder.Folder Colorizer Pro now makes it easy to add your own images as folder background. Or you can also click “File” on the menu bar and then select “Change Folder Icon” to change certain specified Max OS X folders.įolder Color is a fun and easy way to manage and brighten up your OS X folders. Just drag any folder you want to work on into the interface, the appearance of the icon will change instantly to what you made in interface. To apply your customize folder icon, acquire a completely new look of your folder in a flash. To delete all the images you just added, click “Edit” on the menu bar and then select “Clear” which enables you to take back all the operations and return to what it was. Of course, if you want to restart all the settings on the customized image icon, you can delete them via highlight the image and hit the “Delete” button on the keyboard.  If you installed Windows 10, you should also use Apple Software Update to prevent known driver issues.After it’s finished installing, you’ll be asked to restart the system, click Yes. Accept the terms of the license agreement and it will start installing any necessary drivers. The Boot Camp Installer should then appear in a new window. Eventually, you’ll reach the Windows desktop.It’ll take several minutes to finish the setup process. You’ll then need to make some selections for things like language, keyboard layout, and account details. When the installation process asks to install Windows, be sure to select the drive labelled BOOTCAMP.Your Mac will eventually boot into Windows’ setup. Once you’re satisfied with your partition, hit Install.Equally, keep in mind that you’ll need enough space for Windows’ system files, any software you plan on installing, and a buffer of free space. Remember that any space you assign will be taken from the available space for your Mac, and that macOS will run more efficiently if you leave at least 30 to 40GB of space free on its partition. Move the slider to give your Windows partition more or less space.You’ll see a slider representing your hard drive, which lets you decide how much hard-drive space to allocate to your Windows partition. The next step is to partition your hard drive.Now select Choose to the right of the ISO Image box to locate your Windows ISO file. 
Open Boot Camp Assistant, then click Continue.Quit all open applications and then open up a Finder window. Click on Applications and then go into the Utilities folder.Download a 64-bit Windows ISO from Microsoft or another licensed distributor.This method is probably the easiest way to install Windows, but it only works for Macs from 2015 and up. Post-2015 Macs: Install Windows from an ISO file Have an older Mac or a copy of Windows on a DVD or flash drive? Skip to “Installing Windows on pre-2015 Macs” or “Install Windows from flash drive or external optical drive,” below. If you have a Mac from 2015 or later, the process is a bit simpler. Because Boot Camp will be moving and re-allocating space on your hard drive, you should back up any important data before you continue, in case anything becomes corrupted during the process.After restarting, check for software updates again until no new ones are available. 
Go to Updates and install any software updates for macOS. Click the Apple menu in the upper left and then hit App Store.(Need help backing up your data? Our sister site Macworld has put together the best software for backing up your files.) Here’s a list of some of the best tools to free up space on your Mac.īefore you run Boot Camp, Apple recommends you have the latest software update and that you backup your important files. If you don’t have 55 GB free, you’ll have to delete or transfer files until you do. 
It may lack some options, yes, but it fulfills its purpose with astonishing ease.ĪTube Catcher is available for Windows 7 and higher versions (including Windows 11), in Spanish, as well as many other languages. It is a quick, simple, and easy process for downloading videos from the most well-known audiovisual platforms. This is the case with aTube Catcher, a program that streamlines the entire process of downloading a video or a song from platforms like YouTube or Vimeo.ĭownloading a video with aTube Catcher takes a minute or less (depending on the video) and it will be downloaded to the selected folder. It is designed to download videos from YouTube, Facebook, TikTok, Instagram, Twitter, or other websites. Select 'Extract audio' and pick MP3, OGG or M4A, then click. When we think of solutions, sometimes the biggest complications in the world come to mind, and reality is often easier than it seems at times. Copy the URL of a video from your web browser (it supports YouTube, Vimeo, Facebook, Flickr and DailyMotion) and click 'Paste URL'. 
A quick and effective solution for downloading content You just have to select the videos you want to include and the program will take care of the rest. ClipGrab is a free YouTube downloading app that has the advantage of letting you choose which resolution you want. And if you're old school and want to save your favorite videos on a physical disc, you can use aTube Catcher to burn them to a DVD or CD. How to Download YouTube Videos With ClipGrab. You can even merge multiple videos into one or split a large video into smaller parts.Īs if that weren't enough, aTube Catcher allows you to record everything that happens on your screen, such as a video call, a video game, or a presentation, being able to choose the area you want to capture and the output format. Es ist eine gute Wahl, YouTube-Videos kostenlos herunterzuladen. If you already have videos saved on your computer, you can also use aTube Catcher to convert them to other formats or extract the audio from them. Der Video-Downloader Free Instant Downloader für YouTube wurde entwickelt, um YouTube-Videos auf Ihrem Windows-Computer zu speichern. It can download your videos as both MP3 and MP4 files and convert videos from one file format to many others, such as MKV, M4A, AVI, and more. This way, you can play them on any device, such as your mobile phone, tablet or video game console (via a USB drive or SD card). The YTD Video Downloader is a free program used to download videos to your computer, straight from your browser. Videoder is a video downloader for pc which lets you download videos from youtube, facebook, instagram, dailymotion, vimeo and 10000 other sites. Download App Know all the features that Videoder has. 
Thanks to aTube Catcher, you can download your videos in multiple formats: including MP4, AVI, WMV, FLV, MOV, 3GP or MP3, among many others. A tool to back you when streaming on poor connections is a big turn off. 
The program will download the video in a few minutes. To do this, you just have to copy and paste the link of the video you want to download and choose the format and quality you prefer. The most outstanding of all is its ability to quickly and easily download videos from different websites. The process is as simple as copying the video's url and inserting it onto the program so that it proceeds to downloading it, you can also get the video in different formats: Native Flash Video FLV, AVI (both low and high quality) and MP4, this one being the one that lets you download it in the highest quality possible.Īfter selecting the output folder and pressing the download button, you’ll instantly be able to see the progress bar with the time remaining for your download to be complete, you’ll then have the YouTube video available as a local file so you can do with it as you please.ATube Catcher has many functions that make it very useful and practical. YouTube Downloader HD is a free tool that lets you download high quality videos directly from YouTube to your PC. 
Sie können das automatische Herunterladen von Inhalten festlegen YouTube Kanäle, die Sie wollen. It been quite a while now since YouTube allowed users the option of uploading and viewing videos in high quality with definitions of up to 1080p, but not all local download programs allow you to download them in the highest quality. Der 4K Video Downloader ist ein kostenloser Video-Downloader, mit dem Sie Videos, Wiedergabelisten, Kanäle und Untertitel herunterladen können YouTube, TikTok, Facebook und andere Videoseiten. 2/7/2024 0 Comments Smallpdf jpg in pdf 
Insert image into PDF - Embed images into PDF files.Image to Excel - Migrate paper records to digital format.Word to JPG - Extract images from Word instead of PDF.Image to Text - Convert scanned files saved in JPG to editable text files.We strive to simplify how you work with digital documents every day, including images. 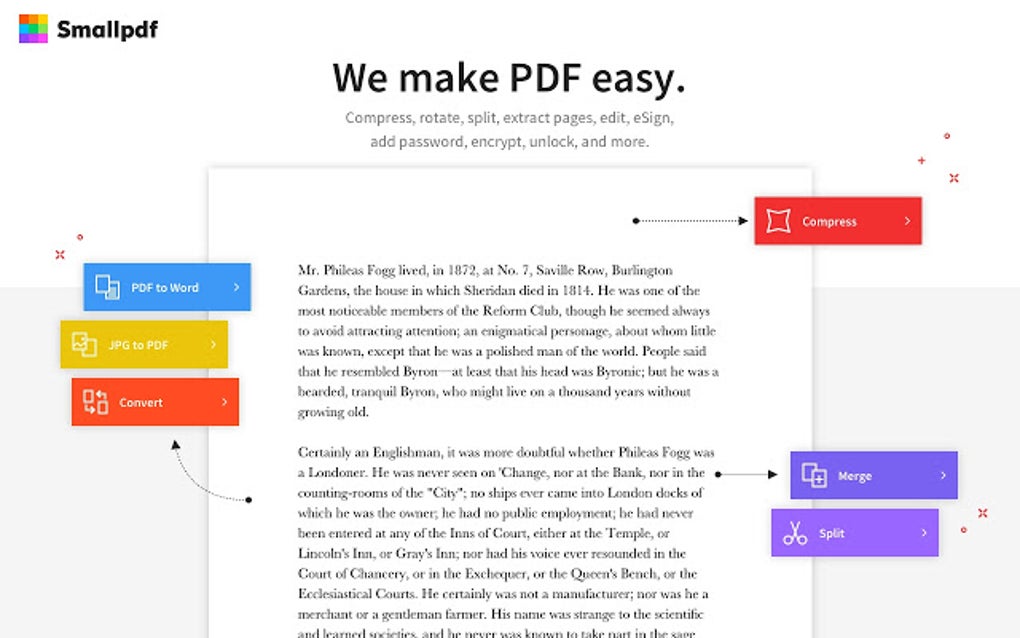.jpg "smallpdf jpg in pdf")
Yes, we’re a PDF software, but we don’t draw the line at the PDF format. When you purchase a monthly, annual, or unlimited membership, you gain access to exclusive perks like unlimited. With support for a variety of image formats, converting your images to PDF is simple. Download or export your edited PDF in Word, Excel, JPG, or PPT. Use our image to PDF converter online free and get access to a suite of other useful conversion tools, all while keeping your data safe and secure. Rearrange, extract, and split pages from the Organize tab. Edit existing text from the Edit tabthis is a Pro feature. Add text, images, and annotations from the Mark up tab. 
Carry On Working With Images After the Extraction Drop and upload your PDF document into the PDF Editor. Baixe os arquivos convertidos como imagens JPG individualmente ou coletivamente em um arquivo ZIP. Clique em 'Escolha a opo' e aguarde a concluso do processo. Selecione 'Converter pginas inteiras' ou 'Extrair imagens individuais'. Using low-quality non-retina displays is also a drawback as it will fail to display and capture the image in its highest quality. Como converter PDF em JPG online: Arraste e solte seu arquivo PDF no conversor. The downside of screenshots is the lower resolution of the picture. We’ve written an in-depth guide on this topic to help you take screenshots quickly and easily. You can then paste it into a document or image program. On Windows, you can always rely on the snipping tool or the “Print” key, which will save the image in the Windows clipboard. With CMD + Shift + 3, you can alternatively save your whole screen as a PNG. If you’re using a Mac, hit CMD + Shift + 4 to select the image and take a screenshot. If you have a slow internet connection, here’s a little workaround to extract an image from a PDF: You can take a screenshot of the image from your PDF and save it. The Alternative: Take a Screenshot of the Image You don’t need to purchase a premium subscription, such as Adobe Photoshop or Adobe Acrobat Pro, to extract images from PDF because our tools are free to use. The converter can also handle other image formats, such as PNG, TIFF, GIF, and BMP.Īs Smallpdf is a full-on cloud service, you can access our platform via almost any conventional operating system, ranging from personal computers to mobile devices. This will let you undo this process and turn those images back into PDF files. If you want to do the opposite, there is a reverse function called JPG to PDF. You can also extract every page in a PDF file to an identical JPG image. Yes! This tool, along with our 20 other PDF tools, is free to use for anyone with an internet connection. Afterward, you can use the image individually, insert it into other file types, or edit it-it’s entirely up to you. Our software will retain the image’s resolution as close to the embedded image as possible. By doing so, you’ll swiftly export all images stored in the PDF into JPG images in just a few seconds. 2/7/2024 0 Comments Google chrome download free 
Google Chrome is one of the best available web browsers in the market. With your contribution, fewer bugs will make it to the stable version. You can do this by going to the Help menu and clicking on the ‘Report and Issue’ option. To help fix the problem, you can easily provide valuable feedback to the developers. This is because those features are still under development and may malfunction. When you start using the Google Chrome Beta version, you will notice a few bugs and issues. In the latter, you just get a few additional features that haven’t been released. This ensures that the overall browsing experience remains the same whether you’re on the stable version or the beta version. Apart from a few compatibility issues, almost all extensions work just fine. Google Chrome Beta also supports extensions. This option is also useful when you’re trying to check the version you’re on. Once there, you can easily switch between the beta and the stable version. All you need to do is click on the menu icon on the top right corner of the screen and click on the ‘About Google Chrome’ option. Switching between the stable and beta versions of Google Chrome is quite simple. Considering that the application is in the beta stage, users are advised to use the stable version for banking and shopping. One of the best things about downloading Google Chrome Beta on your Windows computer is that it lets you access all your data, including your history, bookmarks, and settings by simply logging into the browser using your Google account. /cdn.vox-cdn.com/uploads/chorus_image/image/58042433/chromelogo.0.0.jpg "google chrome download free")
What are the new features of Chrome Beta? Apart from occasional crashes, Google Chrome Beta works just as well as its counterpart while offering various additional features and capabilities. If you're new to Chrome, you’ll find the interface to be very user-friendly, with several options for tabs, bookmarks, settings, history, and more. Instead, you’ll be able to easily pick up and use the application without facing any issues. If you’re familiar with the interface of Google Chrome, you won’t find any new surprises in the beta version. Users who download Google Chrome Beta on their Windows desktop can explore several new features that may or may not get released. The only difference is that the beta version is always a step ahead of Google Chrome - the stable version. Just like Google Chrome, Google Chrome Beta is a web browser that lets you surf the internet, check your emails, download files, open sites, play music, and do much more. Enjoy the latest features before they’re released!  Need more practice? Go back and repeat some of the previous steps. Regularly to keep it in your mind! Otherwise your brain will quickly forget it. If your recall of the table is up to scratch, then move on to your next table - but keep practicing You should aim to be able to answer a times table question almost instantly - certainly within about 5 seconds! Next, see how good your recall is by trying a practice sheet, or getting someone to test you. The more you say the table aloud, the more you will learn it like you learn word to a song. Repeat, repeat and repeat some more - repetition is the key to learning tables (or other facts). This is the auditory learning - not only have you spoken the table but you have also heard it. Next, read it aloud - sing or chant the table. This is useful to see what the times table looks like. One of the best ways to learn their tables is to followįirst, write down the times table you want to learn. To see all my free products in one place click here.Once you have understood what multiplication is, you are then 
Following me notifies you when I post a new item and you can get it half off for 24 hours! Why is feedback so important? Each time you provide feedback, you’ll earn TPT credits that can be applied to future purchases to save you money! Plus, the feedback you provide helps me make my products better suit your needs!Ĭlick the green star beside my name at the top of this page OR at the top of my store page. Beside each purchase you'll see a Provide Feedback button, click it and you will be taken to a page where you can leave a quick rating and a short comment about the product. 
*** How to get TPT credits to use on future purchases *** These resources can be used in a variety of ways, whole class lessons, independant learning, homework, home schooling, sub plans and moreĬheck out my store for more math resources This product is included in my Times Tables Bundle
2/7/2024 0 Comments Mcreator multiblock structure 
Replace EXAMPLE_BOOL_BLOCKSTATE with an uppercase of your logic property, and replace your_blockstate_name_here with the logic property you created in the procedure. Add this code to your block: public static final BooleanProperty EXAMPLE_BOOL_BLOCKSTATE = BooleanProperty.create("your_blockstate_name_here") You'll need to add this import if you're using true/false for the blockstate: import. Īnd this import if you're using numbers for the blockstate: import. Open up your block in the custom code editor Next, assign the procedure to your block. You can do whatever you want in your procedure, but make sure to use this block in it with your blockstate's name. If you use true/false, you will want the 'Set logic property of block at xyz to true' If you use numbers for the blockstates, then you will want the 'Set number property of block at xyz to 0' This can be useful for when items appear to big or small in a perspective, and need to be scaled up for better visibility.DISCLAIMER: You might need to know a bit of java, depending on what you want for your block.įirst, to make things easier, I recommend installing Blockstate procedures.Īfter you install it, you will have a couple more procedure blocks.ĭepending on how your blockstate works you will need different blocks. Scale controls the overall size of the object. Translation controls physical location of the item or block in the perspective.īasically this controls the offset on the X, Y and Z location where it will be viewed from. Rotation controls the three axis angles X, Y and Z in that order Now we move on to the last section for this guide the "rotation", "translation", and "scale" settings keep in mind the "pose angle" is not used in your display settings and is just used for seeing how the angle of the pose looks at other degrees. These are just to see how it looks on other parts of the game like when the item is being held by a zombie or by a player or in a armor stand etc. The next line has some general perspectives for each setting each tab has their own references. The next line of icons under "perspectives" has several display ports for your item or block in the following order. In the example above you have three control sections first being "presets" that controls the copy and pasting as well as making custom presets or using existing ones you have made or the default game presets. If you click on the tripple dot icon you can apply it to just one slot or all slots which will apply it to just the display page your on or all pages. In addition you can quickly set up a perspective using built in presets for the following. Blocks display settingsįor blocks and items there is one extra tab that can be selected that can change the display or view settings of different perspectives when using the item, things like hand view perspective third person and other world display settings like item frames and dropped items. It could be handy to paint over the cubes using Blockbench's paint tools then export the image and texture it in third party applications so you know where the pixels are for your texturing. Keep in mind if you use a third party application you will need to pop back in and out of blockbench to check the changes. You can now paint the cube faces using the build in paint tab or export the texture and import it to a third part image editor like GIMP or Paint Dot Net. Keep in mind folders (bones) don't have UV maps. Once you have done that you should have a UV map like below but with the amount of cubes you have in your model. And use the same name as your file name for your model.Creating entity and block texturesįor entity and block textures follow the steps below. The fix for this is just to add a sub bone or folder to the main folder. In order for animations to be render correctly you must use sub_bones so that when the animation is applied MCreator won't render the animation at odd angles. Your outliner structure where your cubes and bones are made should look like the following in newer versions of Blockbench. Use the chart below to find the proper export version for your mod's game version Export setting: The characters must be English lower case letters and no spaces or characters should be used exept for '_'.The names above must not be the same as any other modded entities in your mod's namespace.File name, texture name, and model identifier name must be the same.Your project settings should be as follows 
To create living entity models you will need the "modded entity" workspace. Read the chart below to know what Blockbench workspace you will need to use. The workspace you will need to use will vary depending on the model type. Select the workspace from the new tab option under the "Minecraft" category you will find the list of workspaces here. You will need a free program called Blockbench for this tutorial. |
AuthorWrite something about yourself. No need to be fancy, just an overview. ArchivesCategories |


 RSS Feed
